
USB flash drives (alias “thumb” drive) may work passé in a world where air ordering and cloud storage solve the filtransfer problem. But they are still very useful for handing over files to another user when your Macs are nowhere near, to move very large files and more. You can even use them to give a PC user a file from your Mac and vice versa.
When you get a new flash drive, you can connect it and it will appear on your desktop, no matter how the drive is formatted. (You may be asked to allow the accessories to attach if you have configured MacOS’s system settings for privacy and security> Accessories that way.) However, you must consider reformating this drive before using it. There are other available formats that may be better suited to your needs.
In this article we go over the different formats and why you choose one over the others. When you learn about the formats, you can select one and format your USB flash drive correctly. If you are in the market for an external SSD device, read our best choice for external SSDs.
What is a file system format?
Before we cover the different file system formats, it is important to know which file system format is in the first place. It’s basically the way a computer manages files on a storage device. Different operating systems (for example, macOS and Windows) support different file system formats, and each format offers its own features.
There are four different formats you can use on a USB flash drive. The type of file format you choose depends most on which computers you plan to use the drive with. Some formats can be used on different operating systems, while others can only be used on an operating system. It is important to choose a format that best fits how to plan to use the USB flash drive.
To only Mac-Storing Devices: APFs
APFS is the Apple File system that is currently the default format. It was created with flash drive and SSDs in mind. These types of storage devices use chips that can wear out over time, although it depends on how often data is written to chips. For most users, an SSD or Flash Drive will last in addition to your ability to use it. To help prevent wear, APFS is designed with writing efficiency in mind to extend the health of a device.
APFS offers other features such as strong encryption, space sharing, snapshots and more. It also offers on-demand disk space distribution to a partition. MACs with internal SSDs must be formatted with APFs.
While APFS was made for SSDs and flash drives, it can be used with hard drives, but a few reports say you may experience a little slower performance. You should consider using Mac OS expanded instead (see below).
These USB-a-flash drives need a USB-C adapseR should be used on most modern Macs.
Jacqueline Macou / Pixabay
APFS was introduced in MacOS 10.13 High Sierra, so Macs running an OS ELDER THAN THAT WILL NOT BE ABOVE TO APPECT APFS FORMATED DRIVER. For the older MACs, use Mac OS -EXPLOSED (see below).
Drives formatted with APFs can only be used on Macs running MacOS 10.13 High Sierra or later. APFs drive cannot be used with Windows PCS. Learn more about APFs.
For older Macs and Mac-Kun Hard Disks: Mac OS Extended
Before there were APFs, there were Mac us expanded, also known as HFS + (hierarchical file system +). It was created at a time when hard drives were the dominant form of storage, internally or externally. It was introduced in Mac OS 8.1 in 1998 when it replaced HFS (hierarchical file system), the original Mac file format.
HFS+ lacks some of the features of APFs created to improve the efficiency of SSDs so that HFS+ can affect the speed of an SSD or Flash Drive. This lack of efficiency also affects wear on flash memory.
When the Mac OS expanded for hard drives, it is best used for such, even on today’s MACs. Any hard drive, SSD or flash drive that will be used on Macs with MacOS 10.13 high Sierra or older, need Mac OS extended. Storage devices for time machine must be formatted with Mac OS expanded.
Storage units formatted with Mac OS -Extended can only be used on a Mac. If you want to be able to connect a storage device to a Windows PC, use EXFAT or MS-DOS (FAT).
To Mac and Windows: Exfat or MS-DOS (Fat)
To use your USB flash drive with both MACs and Windows computers, you have two file formats to choose from: Exfat or MS-DOS (FAT). “Fat” stands for File Allocation Table, and Exfat is a newer version while MS-DOS (FAT) is older.
MS-DOS (FAT )’s major restrictions is that it can’t save files larger than 4 GB and its maximum partition size is 8TB. However, MS -DOS (FAT) drives can be used on all versions of Windows. Exfat has a maximum file size and partition size of 128 petabytes, but it cannot be used on Windows versions older than Vista.
Which one are you going to use? Use MS-DOS (fat) unless you work in video, large databases, images or something else that creates large files, or you have a flash drive that is larger than 8TB and you do not want to divide it into multiple partitions. In fact, your USB flash drive is probably already formatted with MS-DOS (fat) -The most are. Otherwise, use Exfat.
If you are using a Windows -PC to format a flash drive, you will find a third choice, NTFS. Macs can read NTFS drives, but they cannot write to them without special third-party software. Apple’s disk tool cannot format drives like NTFs.
For other devices: MS-DOS (fat)
If you need to use the flash drive with another device, such as a TV, use MS-DOS (fat). For example, you may be able to transfer a video from your Mac to your TV. Or you downloaded files needed to upgrade a device with a USB port. Since MS-DOS (fat) is so universal, the chances of these devices are compatible with it.
Choose a partition scheme
Okay, so you’ve found out which file format system you need. But wait! There is one more thing to find out: the partition form or “schedule” to which it is referred to in the Disk Utility Tool app.
ONE partition In storage, Parlance is a section of a storage device. For example, if you have an 8TB drive, you can decide to format it into a partition of 8TB and it appears on your Mac as an 8TB drive. Or you can decide to divide this drive into, for example, two 4TB partitions, and then you would see two 4TB drives on your Mac. The scheme Tells the computer how the files are organized.
In the Disk Utility app there are three schemes from which to choose:
- GUID PARTITION MAP: For all Intel and M-Series Macs. Select this if you do not plan to use the drive with a Windows -PC. Later versions of Windows can use this schedule, but you feel better about using …
- Master Boot Record: This scheme works on Windows PC and Macs.
- Apple Partition Map: Use this only if you want to use the drive on an old Power PC Mac.
How to format a USB flash drive
Formatting a USB flash drive (or any storage device) can be performed with the disk utility app found in applications/tools. These are the steps to format the drive.
- Time to complete: 5 minutes
- Required Tool: MacOS (Sequoia shown here; the steps are similar in older versions)
- Materials required: USB Flash Drive or other external storage device
Disk Utility
Foundry
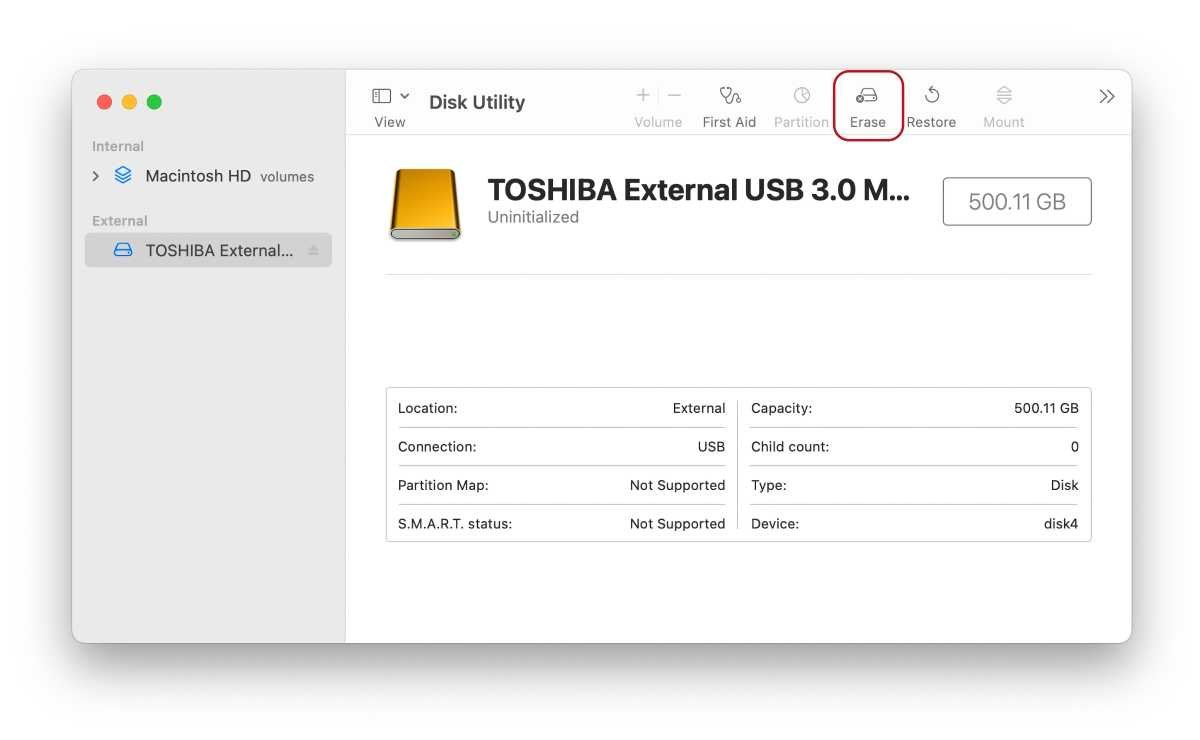
On Disk Utility, select your USB flash drive in the external section of the left column. Click Plain button.
Name, format and scheme
Foundry
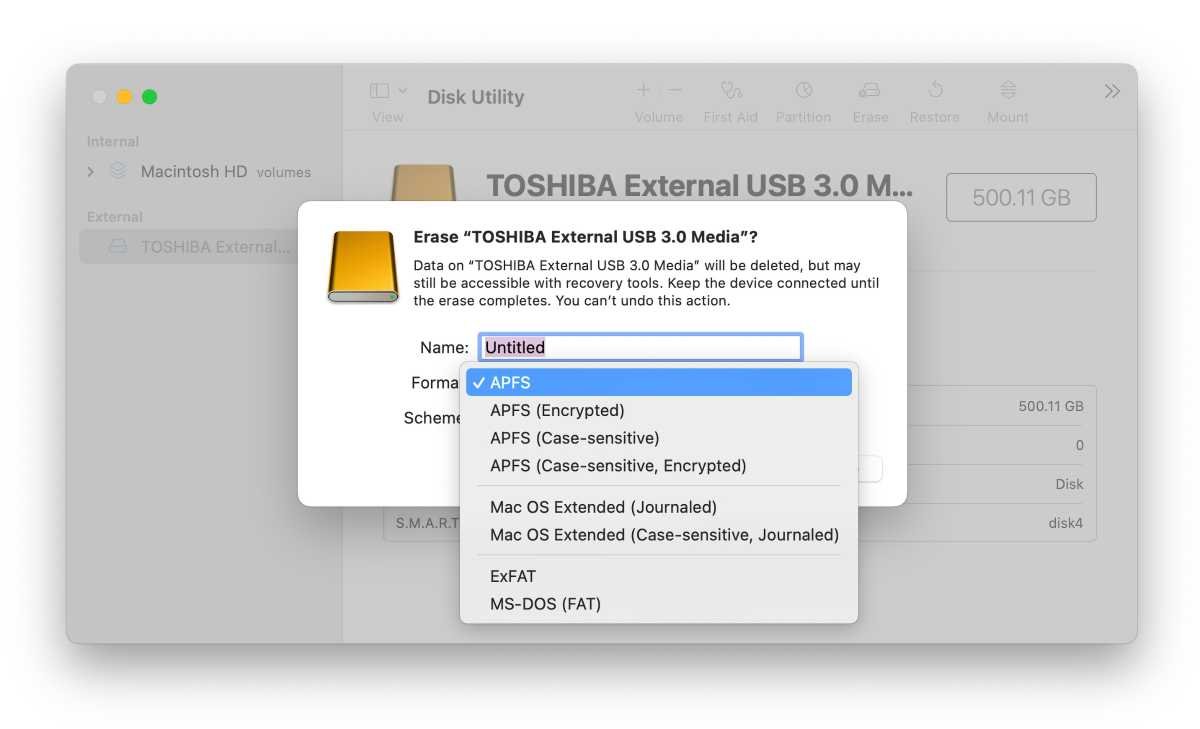
- Give your drive a name in Name field.
- Click to extend the menu under Format To select your format type.
- Click to extend the menu under Scheme To select your partition scheme.
Delete the drive
Foundry
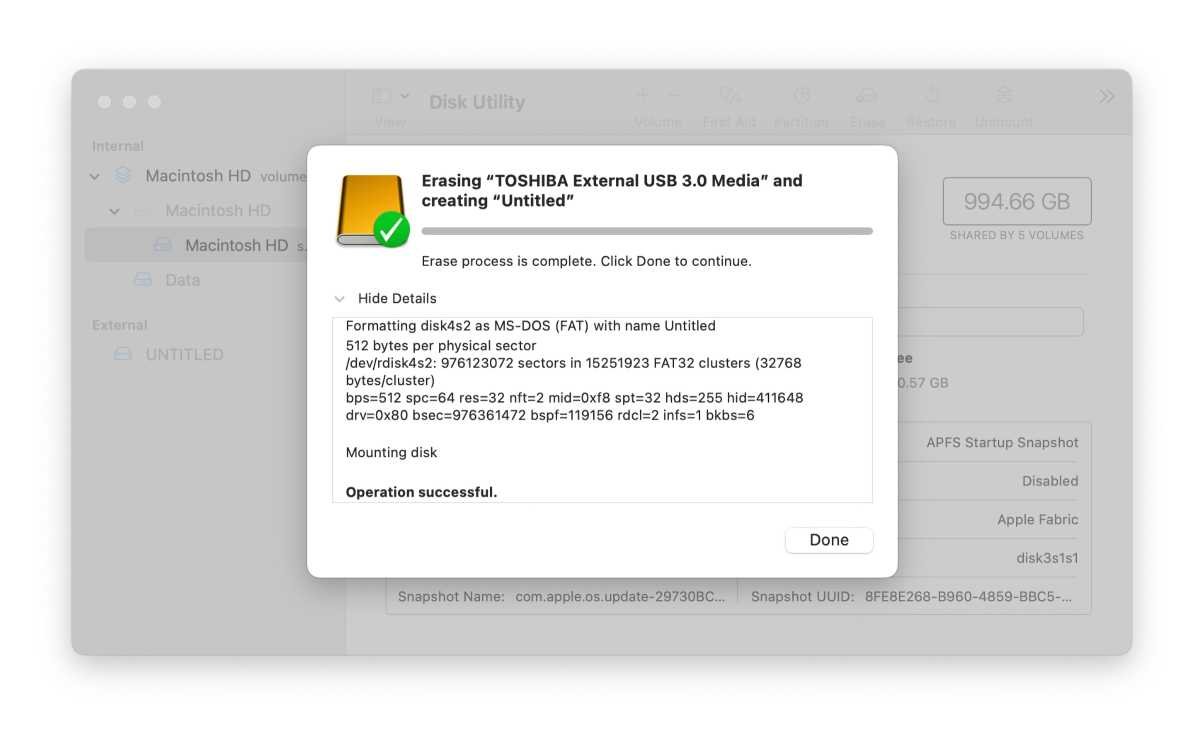
Click Plain When you are ready to format. You will not see a confirmation window, so click only when you are sure you are ready to go. A status window appears when your drive is ready to be used.
Foundry
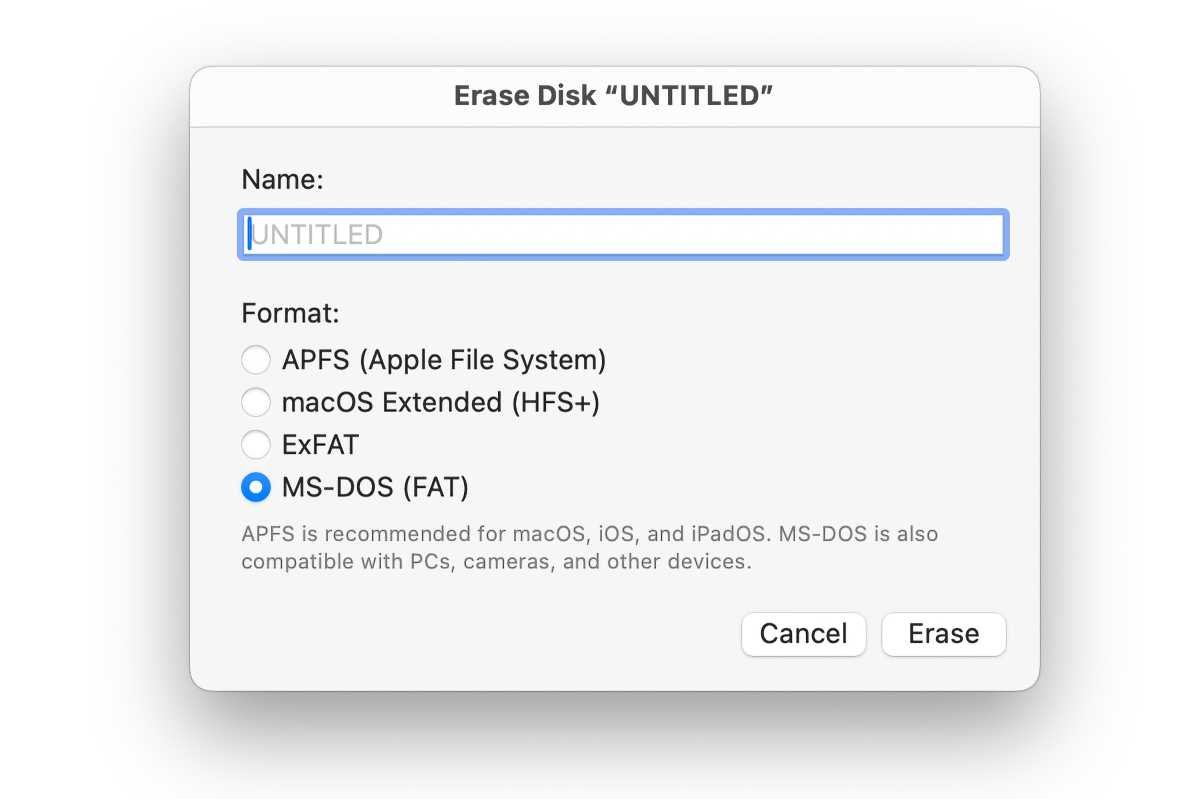
You can also format a drive if you set finds to display storage devices on the desktop. Check click on the icon of the device and select Delete Disk, and then a window is displayed that asks for the name, format and any settings you want to select (see image above). You do not need to choose a partition scheme when using this method.
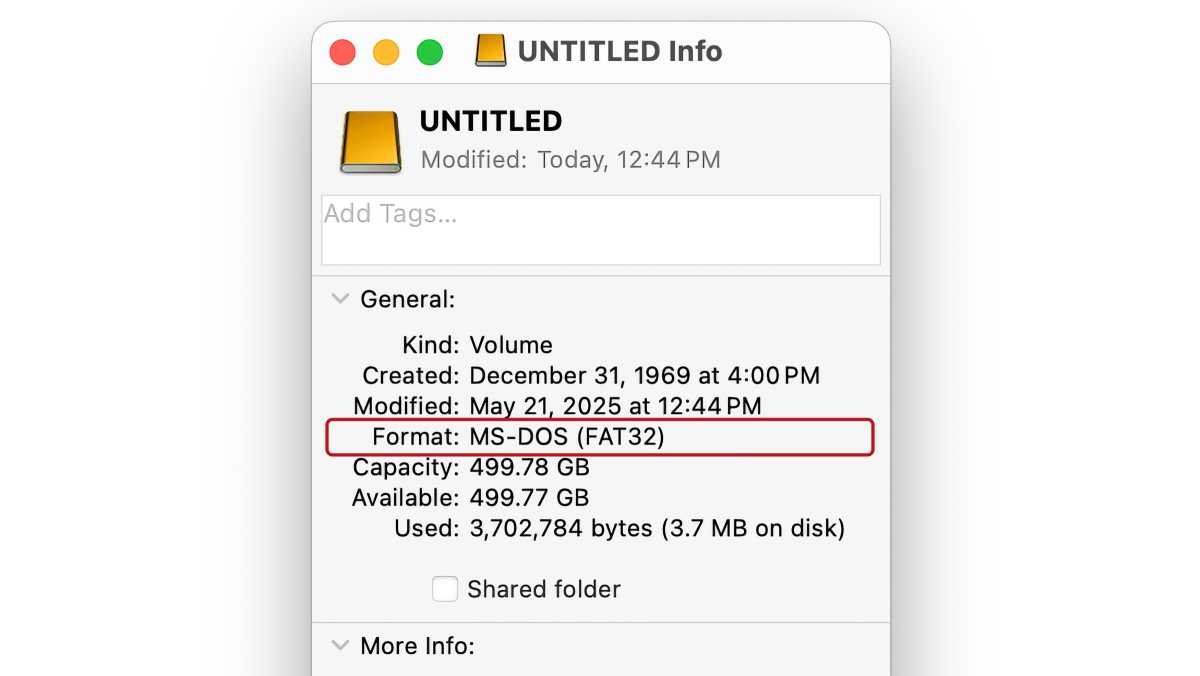
To check a drive format
To see what format a drive user, you can find out in the disk tool app. You can also get info on a device (select the one in Finder and Press Command+I) and check the list under “Format.”
Foundry