Usually, when you connect an external hard drive to your Mac’s USB port, you will see it appearing on the desktop. You can also see it in a finding window in the left column under locations (or devices in older versions of macOS). If the drive does not appear on your Mac, it is likely that it has not been properly formatted, has been damaged or is defective. Alternatively, you may have set a password password that you need to enter before it can connect.
We will show you how to find out if the reason why the external drive is not mounted on your MAC up is due to a problem with the drive itself, the wired or the gate and how to solve the problem and access data on your drive.
PROMOTION
EASEUS | Check and manage hard drives on Mac
Why don’t the hard drive appear on your Mac? How to get it fixed quickly? No worries. Easeus Partition Master to Mac comes in. To check and find hard drives both internal and external, scanning it the devices, provides a clear overview and diagnose what happens to your disks. In addition to giving a clear result, it also asks you to take the next step and quickly solve your disk problem, such as disk formatting, creating a boot disk and converting the disk to be initialized. Now 25% off using the code: Macworld25.
Free trial
This article assumes that you have an external drive to connect to your Mac via USB-A, USB-C or a Thunderbolt port. If you have a NAS drive that connects over the network, read our article on connecting to a NAS drive.
Why does your hard drive not appear on Mac?
We start by trying to identify the reason why your hard drive is not displayed on the Mac before explaining what to do to find the hard drive on your Mac. If you can identify the cause, you should be able to solve the problem that prevents your external drive from opening on your Mac.
Damaged cable, port or insufficient power
The first port of call is always to check that it is connected, but we are sure you have done so. The problem can be with the cable.
One of the main reasons why the drive is not mounted is if the drive does not receive enough power. If the drive gets power via a USB-A cable, make sure that sufficient power is provided for the drive. Very old MACs may require a USB power cable, a cable that divides into two USB connectors, both of which must be connected to your Mac to deliver enough power to the drive. Similarly, make sure the drive does not have an external power supply it will need.
With regard to cables, make sure it is not the error. Try using another cable with the drive to see if it solves the problem. Similarly, if you are using a USB port on a hub, check that it is not what is causing the problem.
Also check that the gate on your Mac is not the problem. Try to use another port. Or if you only have one port, connect another device and see if it works.
The next step is to try to connect the drive to another Mac. If it also fails to mount there, you will know that there is a problem with the drive while if it is mounted, then the problem with your Mac.
Problem Preferences
Hopefully there is a really easy solution to get the hard drive to mount on your desk. Try the following to make sure your Mac is set to show mounted drives on the desktop.
- Open Finder.
- Click Finder in the menu at the top of your screen.
- Click Settings (Preferences in older macOS versions).
- Click General.
- Make sure there is a check mark next to External disks.
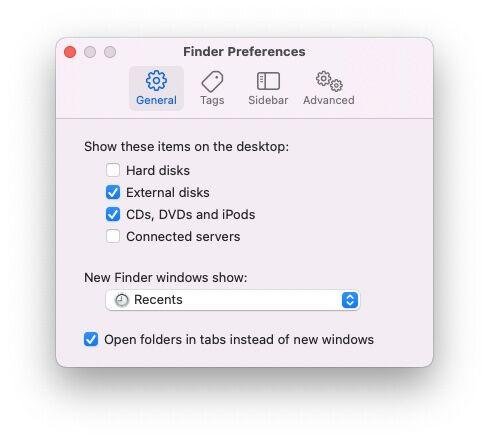
If it was already set up, then the external drive would appear on the desktop, then continue to follow the steps below.
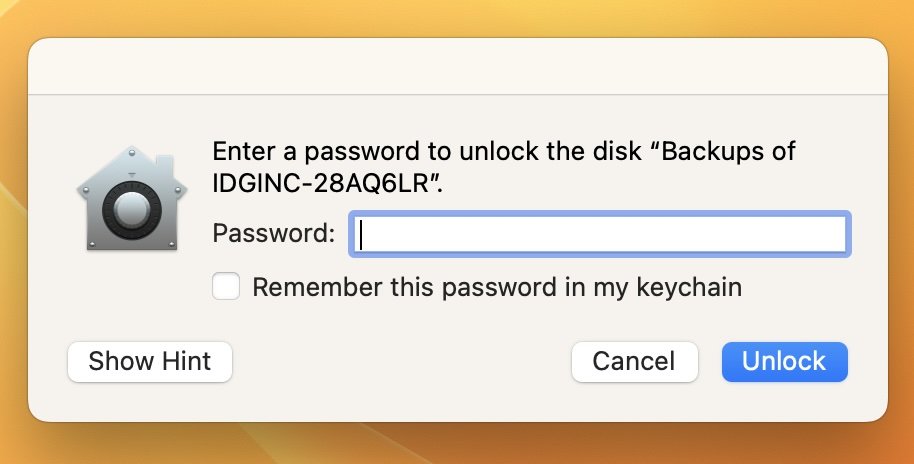
Password protection
You can protect a drive with a password when you start using it, so check to see if the reason your drive is not mounted is that a password request box has appeared and you have not noticed it.
Sometimes the Password popup window also takes a few minutes so it helps to be patient.
Foundry
The drive is formatted into a PC
It is possible that the drive has been formatted using a file system that your Mac cannot read.
- Windows PCs use NTFS or EXFAT file formats.
- MAC computers before Sierra used the file format HFS+.
- In High Sierra, Apple introduced a new file system called Apple File System (APFS).
- There is an old FAT32 format that can be read by Windows and MAC computers, but has restrictions on which files can be stored.
An easy way to find out if this is the problem is to check on a PC. If the drive mounts on the PC, it is likely that you have discovered what the problem is: the drive is formatted for PCs and cannot be read by your Mac. 
To make sure your drive can be read by MACs and PCs, format it using EXFAT or the older FAT32. We explain how to do it below.
It is a damaged or defective drive
If none of the above was the reason you couldn’t see the external drive on your Mac may be the drive may be defective. If that’s it, you can use Apple’s disk utility program to access the disk and potentially solve what causes the problem. We will discuss how to do it below. We will also look at how you can stop a drive that fails in the future.
To repair an external drive that does not appear on a MAC
If none of the above solved your problem, it is likely that the drive is either formatted incorrectly or damaged.
Depending on the reason you can’t see the drive, here’s what you need to do to make it work.
How to transform a drive so you can see it on a Mac
Hopefully the drive is fine, but the format is wrong.
It is possible that the hard drive has been formatted using another file system (ie on a Windows PC). If so, if you need to access the data on the drive, connect the drive to a Windows PC that recognizes it and copy the data before moving on to the next step because the process will involve the transformation of the drive and deletes everything on in).
- To make sure your drive can be read by MACs and PCs, format it using Exfat or the older one Fat32.
- If you want to format the drive to be used only on a Mac, you can use HFS+ or Apple File System (APFS) File formats.
Once you have received data from the drive via a PC, you can reformat the drive so you can add the data again. How to reformat your drive so it can be read by a Mac or PC.
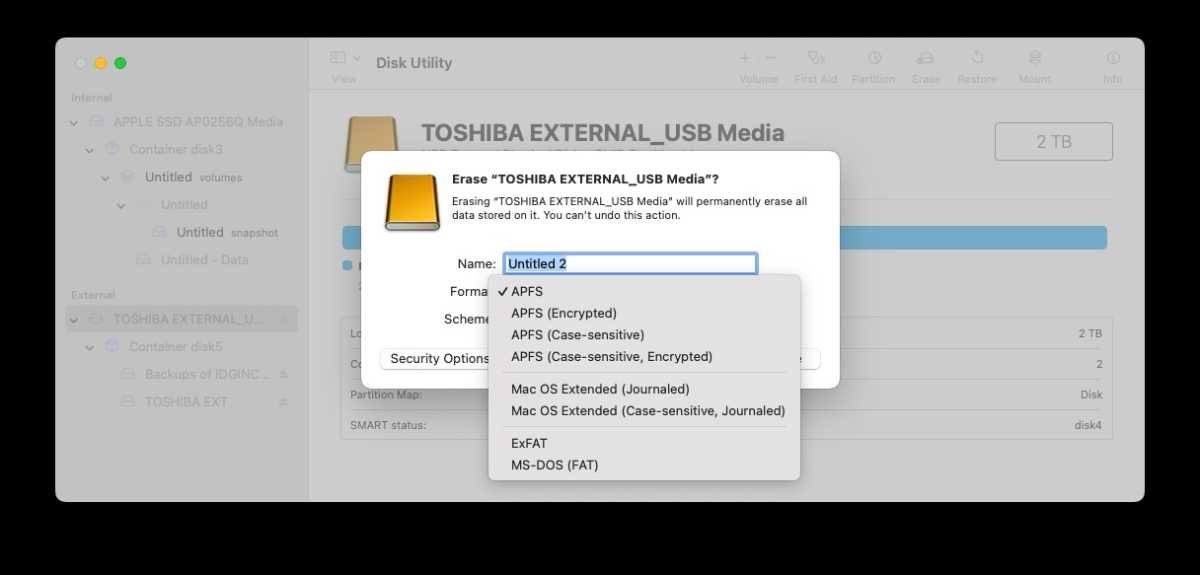
- Open Disk Utility (according to the steps above).
- If you do not need the data on the hard drive, select the disk and click Plain.
- Before the disk tool starts to erase the disk, it will choose a format for you. You can change this if you click the formatting settings. Choose your format, Exfat if you want to make sure it’s compatible with PC and MAC, otherwise Mac OS Extended (Journaled) is probably the best option.
- Click Plain And wait for your Mac to delete, and then format the drive again.
- Give the drive a name.
Screenshot
Foundry
Read more: How to format a drive on a Mac.
To repair the defective drive with Disk Utility
If the different controls above indicate that the disk is defective, you can use Apple’s disk tool program to access the disk and potentially solve what causes the problem. Here’s what you need to do:
- Find Disk Utility by opening Spotlight (CMD+space bar Disk UtilityPress ENTER to open the program.
- Look in the column on the left to see if the hard drive is displayed there.
- If you can see the hard drive in Disk Utility, check if there is a treble under it. If it is there click it and select Mount. If your Mac has already fitted the drive, the Unmount setting will be displayed instead. (If there is no volume on the list, your Mac may not access the drive. The mounting setting will be dimmed).
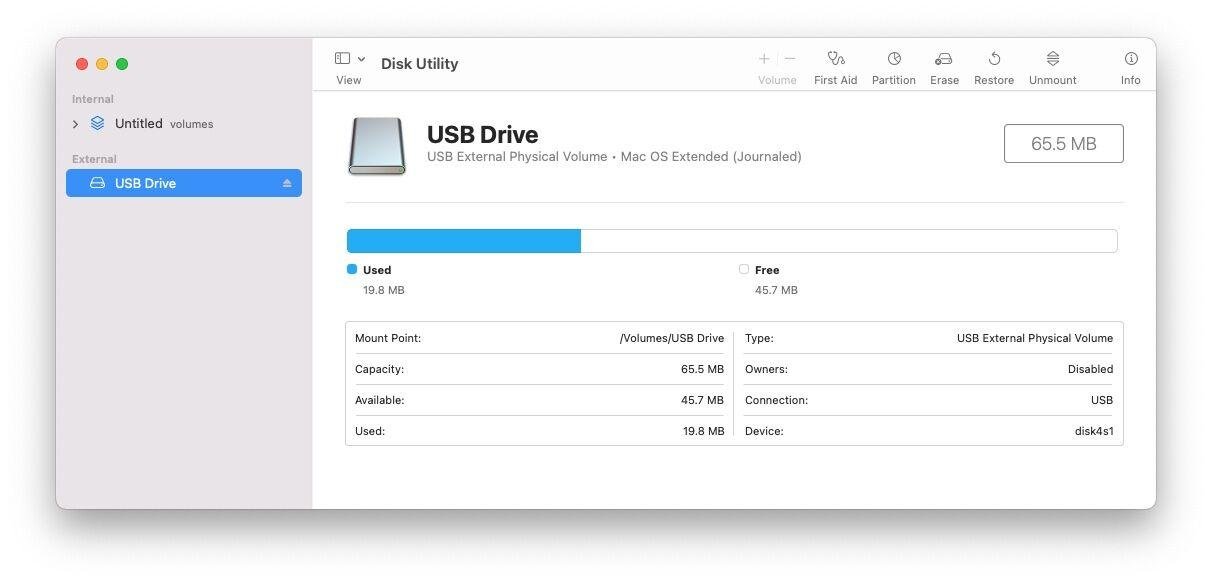
- Your options are first aid, delete and restore. First Aid will check the disk for errors and then repair the disk if needed and this is the option to choose. Recovery allows you to delete the content of the drive and replace it with data from another place. Delete deletes all data stored on the drive. If you need the data on the drive, do not select Delete or Restore!
- Click First Aid The tab and select Run.

- If the Mac after running first aid finds mistakes you can fix, you may see the option of repairing disk. If you do, continue and run the repairs.
Best apps to recover data on a lost drive
If your Mac is unable to repair the disk, it is likely that the drive is either formatted using a file system that the MAC cannot read or it is well and thoroughly destroyed. If it is the latter, we suggest you follow this guide on recovery of data from a damaged disk. You may also want to consider one of the MAC data recovery apps we recommend in our summary of the best data recovery apps for Macs.
Our recommendations include Recoverit from Wondershare, Data Rescue from Prosoft and Stella Data Recovery to Mac.
To prevent problems with hard drives on a Mac
We have a final proposal to make it more a guard against this error happening again.
Make sure your external drive is not damaged in the future by always removing the disk properly after use. Don’t just take out the USB cable.
To dismantle your drive you can right-click (control click) on the icon on the desktop or in find and select Eject. Drive problems can occur when the disk is removed without pushing it out properly.
Have you decided that there is no hope for your defective hard drive? We have a summary of some of the best we’ve seen here: the best Mac hard drives.